The sections below will cover the following:
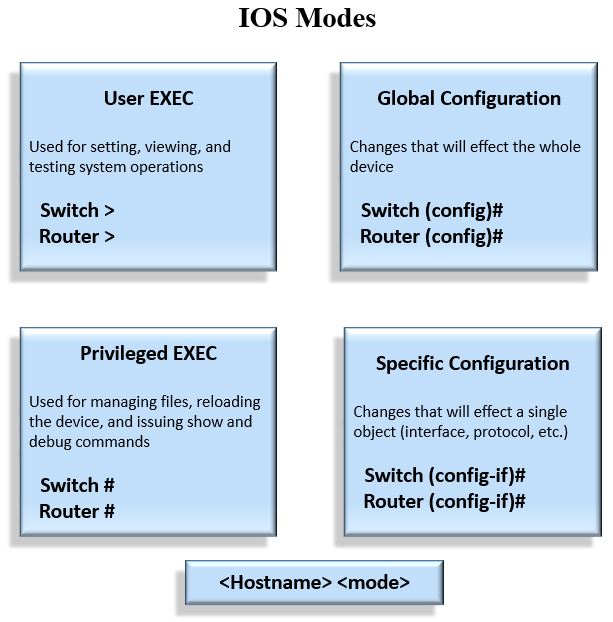
Cisco designed the IOS using command containers called modes that provide hierarchical separation based on the system operations the commands can perform (Cisco, 2002).
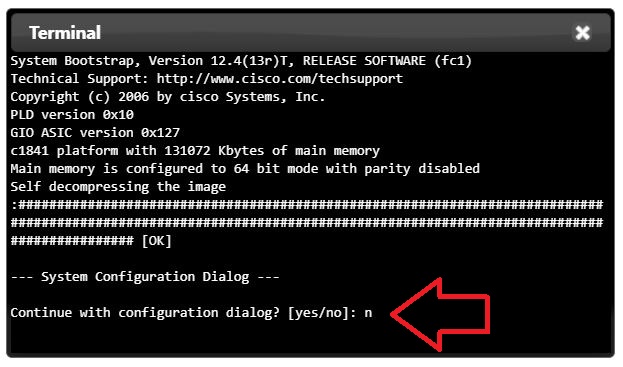
When this router is at it's defaults, a setup dialog will can be used to automate initial setup. Note: the first step illustrates the use of the embedded terminal. All subsequnet steps are performed on a live router and you can use the embedded terminal to follow along.
|
1
|
Execute the following command to decline the use of the setup dialog |
Continue with configuration dialog? [yes/no]:n
Cisco's help is a question mark "?".
|
2
|
Execute the following command to view the commands under User EXEC mode |
Router>?
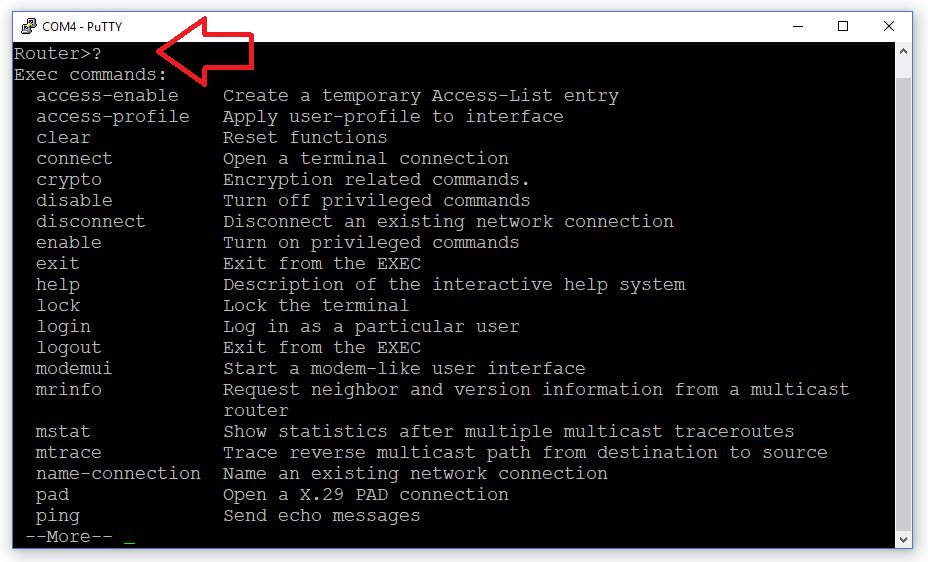
- Press the q key to exit
- Press the Enter key to display a line at a time
- Press the spacebar to display a page at a time
The commands under User EXEC mode are mostly used for basic troubleshooting. One command option is the enable command, which is used to go from User EXEC mode to Privilege EXEC mode (a.k.a. Enable Mode).
|
3
|
Execute the following command to go from User EXEC mode to Privilege EXEC mode |
Router>enable
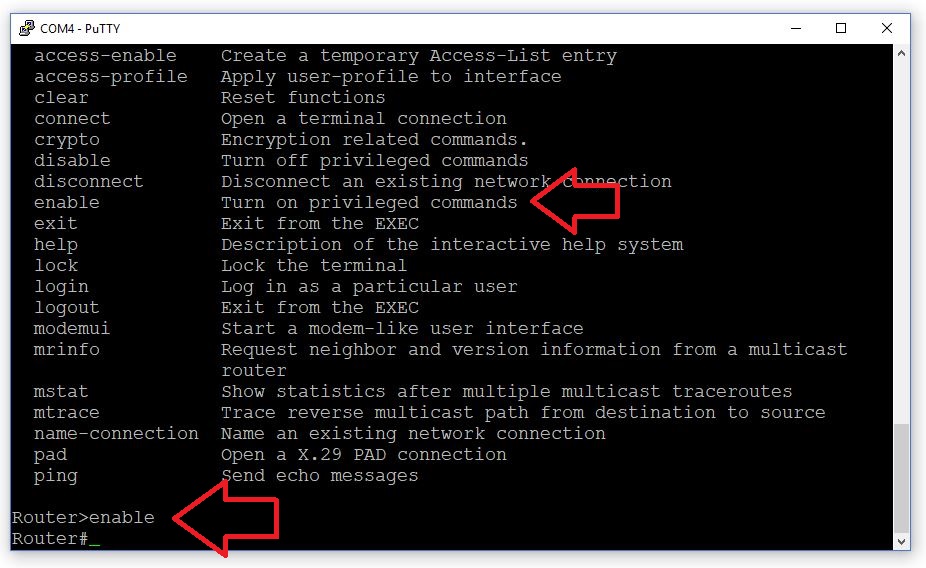
Privilege EXEC mode contains the same commands as User EXEC, but with some addition commands as well. The commands under both of these modes are known as EXEC commands. The additional commands within Privilege EXEC mode are still mostly used for troubleshooting, but these commands can be more taxing on the system (ex. debug, reload, etc.).
|
4
|
Execute the following command to view the commands under Privilege EXEC mode |
Router#?
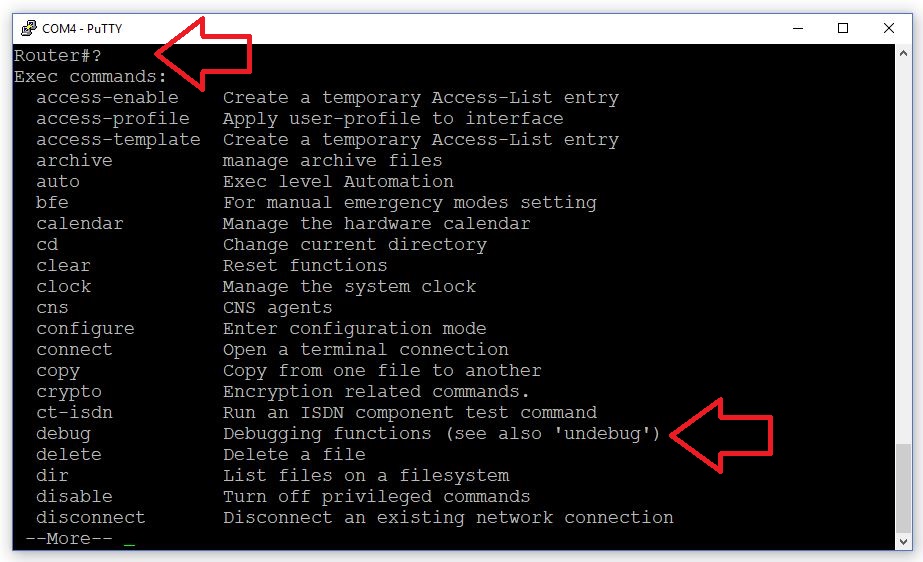
The configure terminal command is used to go from Privilege EXEC mode to Global Configuration mode.
|
5
|
Execute the following command to go from Privilege EXEC mode to Global Configuration mode |
Router#configure terminal
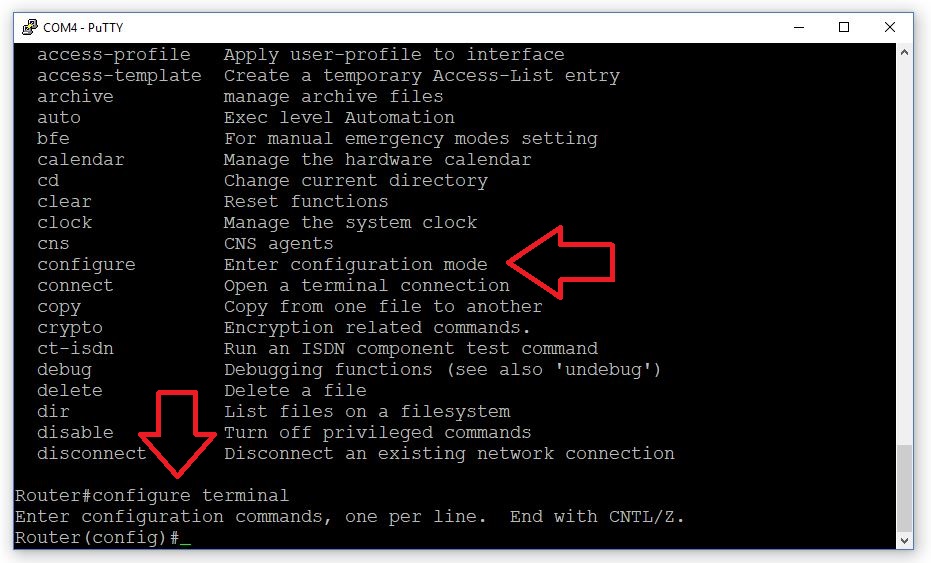
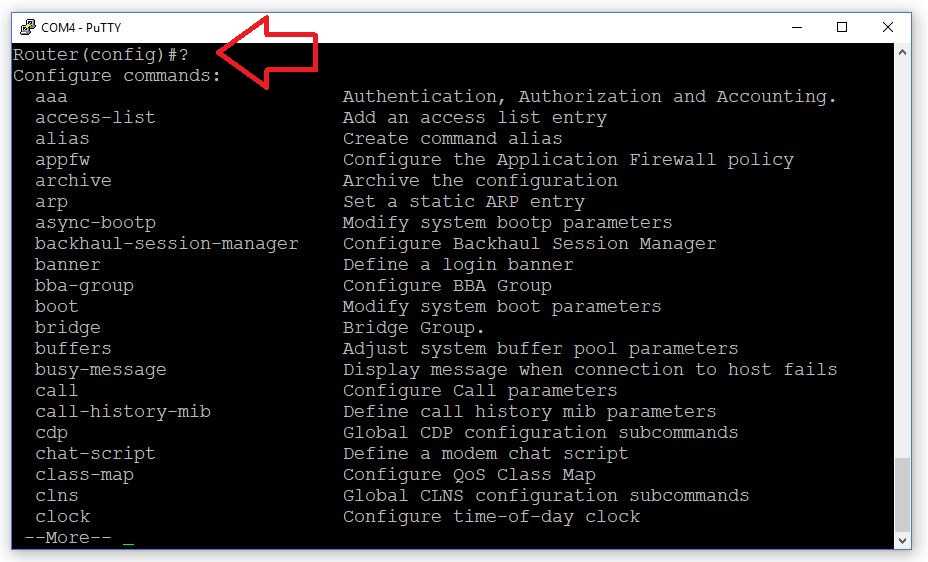
The commands under Global configuration mode are used to make changes that will effect how the system looks or behaves holistically.
|
6
|
Execute the following command to view the commands under Global Configuration mode |
Router(config)#?
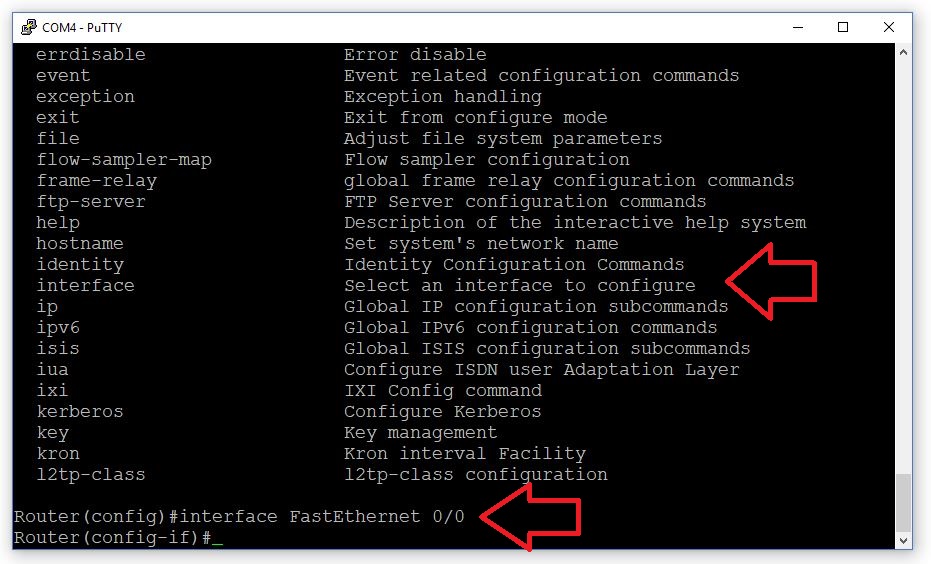
The IOS contains more specific configuration modes (interface configuration, routing configuration, dhcp configuration, etc.).
|
7
|
Execute the following command to enter Interface Configuration mode for FastEthernet 0/0 |
Router(config)#interface FastEthernet 0/0
The end command, or CTRL^z orCTRL^c key combinations can be used to go back to Privilege EXEC mode from almost any position within the mode hierarchy.
|
8
|
Press and hold the CTRL key followed by pressing the c key, to return to Privilege EXEC mode. Then press Enter to return to a prompt |
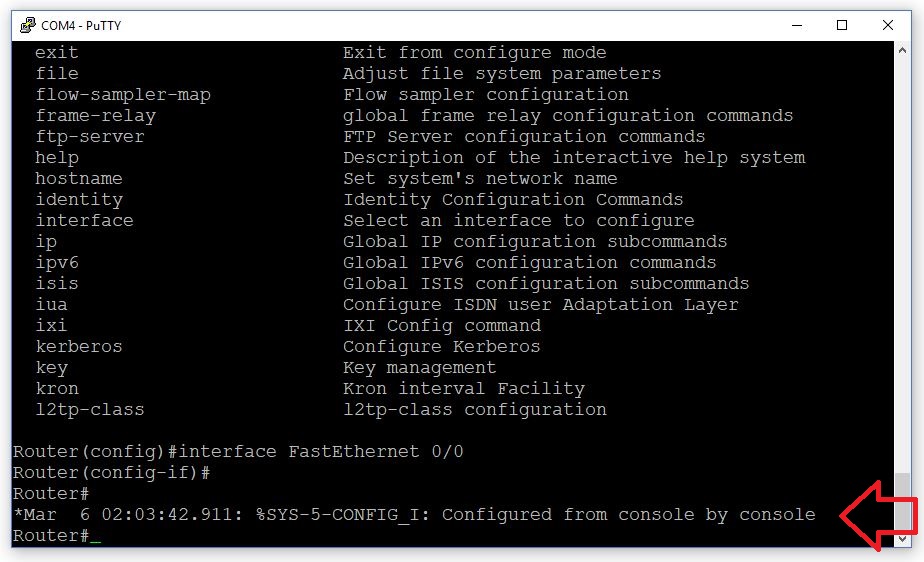
The exit command can be used to go back one mode.
|
9
|
Execute the following command to leave mode access |
Router#exit

The Cisco IOS, like most operating systems, was designed with access control in mind. The first mode (EXEC mode) is split into two levels of access that are assigned different privilege levels. Cisco uses the concept of privilege levels to authorize access to objects on the system. The Cisco IOS has two levels set up by default (1 and 15) and relates privilege 1 with User EXEC mode, and privilege level 15 to access all other modes (Cisco, n.d.).
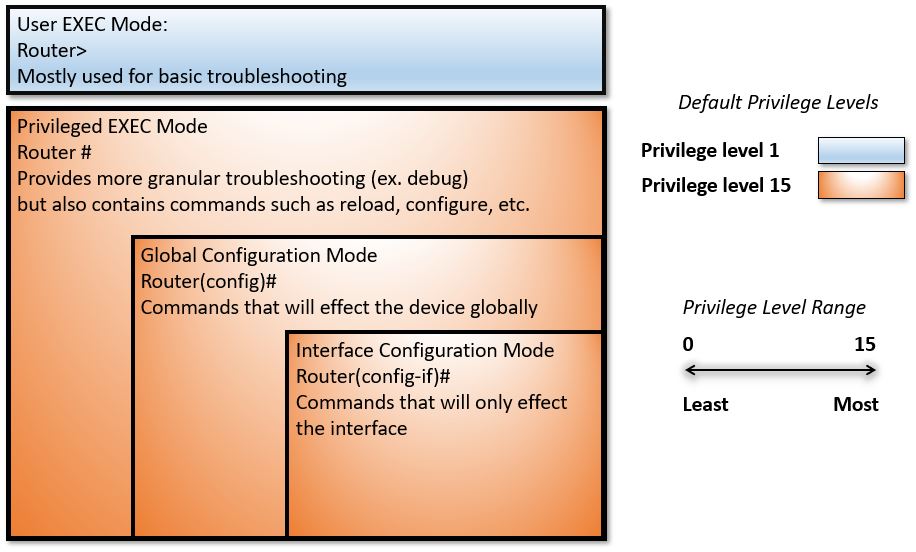
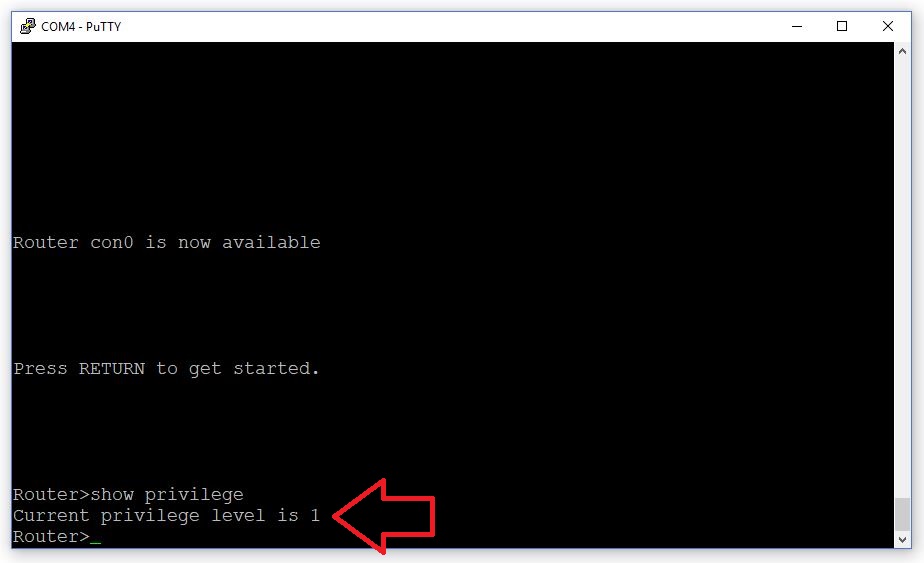
By default User EXEC mode has privilege level 1 assigned to it, and can be thought of as regular user privileges.
|
1
|
Execute the following command to view the privilege level associated with User EXEC mode |
Router>show privilege
All other modes are assigned a privilege level 15 by default. This level is often compared to a super user in Linux or a Mac OS X.
|
2
|
Execute the following commands to verify the privilege level associated with Privilege EXEC mode |
Router>enable
Router#show privilege

Below lists the commands used to navigate EXEC modes.
disable   Turn off privileged commands
exit      Exit from the EXEC
enable    Turn on privileged commands
|
3
|
Execute the following command to go back to privilege level 1 |
Router#disable

When working within the IOS, you must become familiar with the error messages that are presented within the CLI.
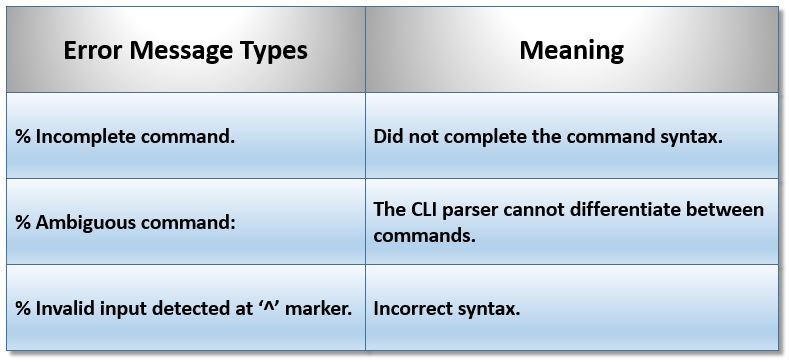
The Cisco IOS uses a CLI-parser for interpreting commands and command syntax. If an admin attempts to execute the short form of a command, but there is more than one command that contains the same characters, then an error will be generated.
|
1
|
Execute the following command to generate an intentional error |
Router>e

The error message let's us know that the interpreter cannot differentiate between commands.
|
2
|
Execute the following command to see where the commands differ |
Router>e?

|
3
|
Execute the shortform of the enable command to enter Privilege EXEC mode |
Router>en

Command syntax means command structure. Think of this as meaning correct spelling with spaces for a sentence if we are talking about the complete command syntax. An example of this is to execute the first level-command show, which requires, at a minimum, a second-level command.
|
4
|
Execute the following command to generate an error by not completing the full syntax for a command |
Router#clock

|
5
|
Execute the following command to see a second-level command that can be used to complete the syntax |
Router#clock ?

The Tab key can be used to autocomplete commands so long as they are not ambiguous.
|
6
|
Type r and press the Tab key to autocomplete the second-level command |
Router#clock r

A carriage return (cr) is another way to say press Enter (Cisco, 2014).
|
7
|
Type the following command to verify the syntax is complete |
Router#clock read-calendar ?

|
8
|
Press Enter to verify the command executes |
Router#clock read-calendar

|
9
|
Execute the following to demonstrate improper syntax |
Router#clock read-calendars

This same error can be generated if the command is not understood under a mode.
|
10
|
Execute the following commands to generate an error by using the proper syntax |
Router#conf t
Router(config)#clock read-calendar

The do command can be used to execute EXEC commands in other non-EXEC modes.
|
11
|
Execute the following to verify the do command allows the execution of EXEC commands in Global Configuration mode |
Router(config)#do clock read-calendar

Your Cisco IOS image file provides commands for enabling features on your device. This section will review some common key options that can be used when dealing with commands inside a CLI or Terminal. However for simlicity sake, below will only make reference to the CLI.
When it comes to Cisco CLI basics, the question mark is the most important key option. But in order to use it properly, one has to understand the system. Below we will take a lower-level look at how it works. Let's begin by looking at the command heirarchy again and describe the IOS modes in terms of the command interpreters. At a basic-level, there are two modes: EXEC and Configuration, where each contains many sub-modes that are accessed from them.
A command interpreter enables a user to execute commands that are available within it's command list. Most times, when accessing a different IOS mode, you are interacting with a different command interpreter.
|
1
|
Execute the following command to view all command interpreters, which are referenced by a Mode Name |
Router#show parser dump all | include Mode
The result.
The command interpreter provides access to various commands and the command parser validates their syntax (command structure). Think of a command interpreter as a gateway to a specific command list, and a command parser as a chunk of code that is used to analyze and validate syntax for each command in the list. The interpreter accepts input (commands) from the user and instructs the parser to use a particular command list when analyzing and validating the user's command against that list. Note: the below image does not display EXEC sub-modes because they are not often accessed during CCNA training.
|
2
|
Execute the following command to view the command list available from the EXEC Mode interpreter |
Router#show parser dump exec
The result.
To better utilize the question mark, think of each command in the command list as a string in an array that is compared each time a command is executed. If the message "% Ambiguous command:" is displayed, this means that there is more than one match in the array. The question mark can be used up against the command to display all matches. The only other way to use the question would be to put space between it and the command, which will return different results.
The command parser also validates and analyzes command arguments and what you get back from Cisco's help is dependent on it's placement within the command structure. Commands may have one or more arguments to them. If a question mark is used where an argument may exist, then the array will only consist of level-x argument strings.
The other key shortcuts listed in the table are typical command shortcuts also seen in other terminals and CLIs. When comfort in the CLI is attained, these key shortcuts can ease administration, similar to how they do in most applications. There are many more key shortcuts, but below will demonstrate the ones which are listed in the above table.
|
3
|
Add the following command, but do not execute it |
Router#clock read-calendar
|
4
|
Issue a Ctrl^a to move the cursor to the front of the command |
|
5
|
Issue a Ctrl^e to move the cursor to the end of the command |
|
6
|
Issue a Ctrl^w to cut one word |
|
7
|
Issue a Ctrl^y twice to paste it two times |
|
8
|
Move the cursor to front of the command argument |
|
9
|
Issue a Ctrl^k to cut everything to the right of the cursor |
|
10
|
Issue a Ctrl^y to paste it back |
|
11
|
Issue a Ctrl^u to cut the whole command |
Click the start button to review the questions that pertain to this webpage.